What is metadata?
What is metadata?
Metadata provides contextual information about your samples, such as:
- Collection details (e.g., date, location, method)
- Sample type (e.g., stool, soil, wastewater)
- Experimental variables (e.g., treatment groups, timepoints)
- Demographic details (e.g., age, sex, BMI, clinical data)
- Consistent Identifiers: Ensure your metadata variables are consistent across groups
- Comprehensive Details: Include as much metadata as possible to support robust downstream analyses.
- Regular Updates: Keep your metadata files up-to-date, especially for longitudinal studies.
- Group Wide-Ranging Continuous Variables: if you have a wide-ranging numerical value for metadata (e.g., ages ranging from 0-60), consider grouping them into categories (Age: 0-18years, 19-39 years, 40-60years). Pick relevant ranges according to your study.
Video walkthrough of Metadata import and generating comparative analyses
Adding New Metadata
Metadata can be added or edited for one or more samples by selecting them in the “Samples” Menu and clicking “Edit Metadata”. Depending on the number of samples selected, you will be prompted to edit metadata categories through a pop-up (Single Edit) or a template .CSV file (Batch Edit).
1. Editing Single-Sample Metadata

- When Editing Metadata for a single sample, a pop-up window will appear to edit default metadata or New Custom Fields.
- Enter a text/numeric/datetime value for relevant metadata categories, or add a new metadata category by selecting “Create Custom Field”.
- Click “Save” once complete to view the updated metadata in the sidebar.
2. Editing Multi-Sample Metadata by Template Batching
When Editing Metadata for multiple samples, select all files and download the template CSV. We prefer to edit these in Excel, ensuring that no formulas/special characters are added and the file be saved as a ..
When downloading the template CSV, you can download a template in 2 formats, as well as the option to include predefined metadata categories (Sample Biom Type, Sample Host, Read Type, Illumina Fragment Length, Sample Collection Date, GPS Coordinates, Study Objectives, DNA Extraction Kit, Library Preparation Kit, Sequencing Platform, Project Name) The platform supports two template formats:
- Long Format (default selection)
- Wide Format
Long format metadata
- Each sample is represented in columns. Each column has a Unique Sample ID (e.g., 1fb0f270-4848-4965-940a-df04b48662f3) and Sample Name (e.g., Sample1) as headers in rows 1 and 2 respectively.The first two rows need to stay constant and should not be modified or rearranged.
- Each metadata field gets its own row. Identifying metadata variables (like sampleID or treatment group) may have repeated values across each row.
- Metadata groups are represented in row 3 and beyond.
- To add a new metadata group, simply create a new row, with the metadata variable name in Column A and the data-type in Column B (either text, decimal, or datetime)
- If predefined metadata is selected: row 3-15 represents system metadata fields which are optional fields to fill out if relevant to your project.
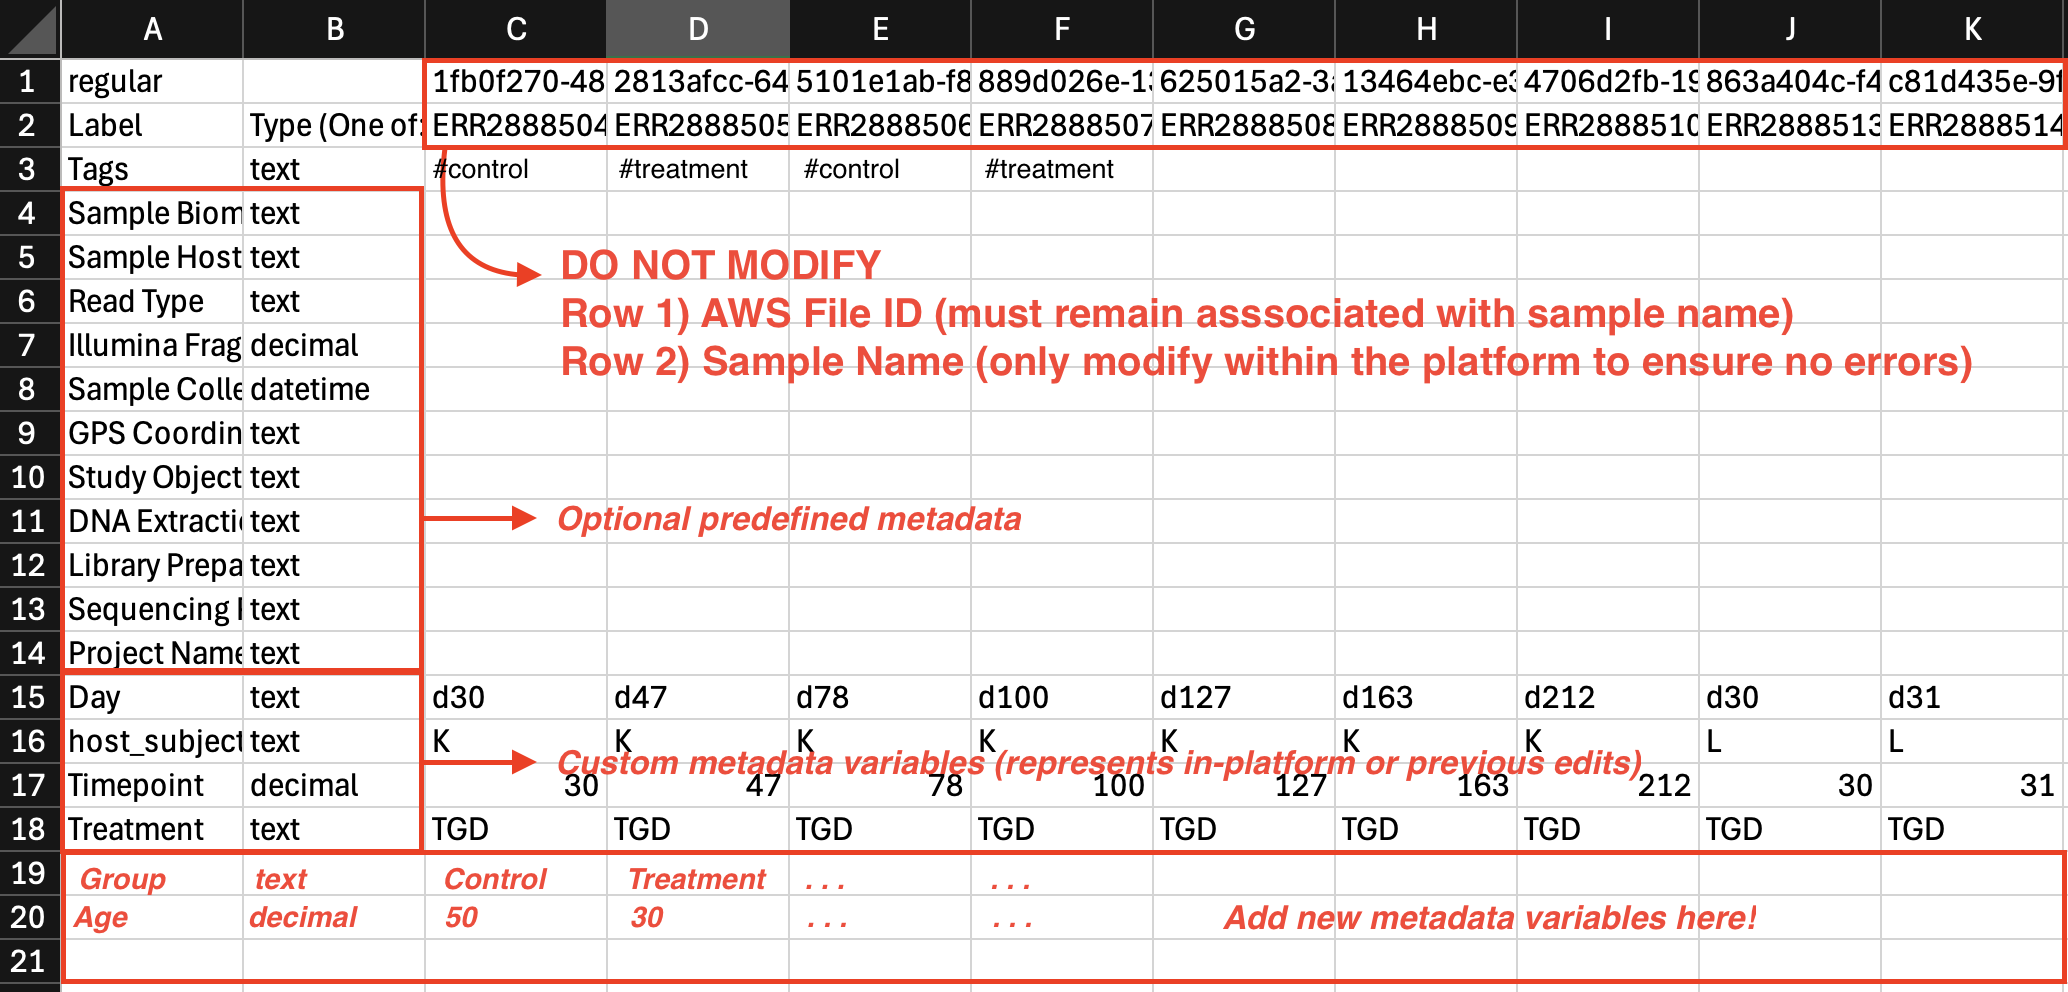
- Both Label and **Type (One of: text | decimal | datetime) **are required in columns A and B.
- Custom Metadata Field Labels cannot contain any special characters or spaces.
- Text fields should not exceed 32 characters.

How to delete existing metadata categories
To delete existing metadata categories entirely, follow these steps:- download a template CSV for your samples
- delete the variables for each sample, leaving the text in the Key/Label/Type/Example (columns A-D).
- Save the file and reupload to the platform.
- You’ll now see that the variable category has been completely deleted.
Facing issues with metadata?
Read through common pitfalls and errors during metadata upload at our Troubleshooting Common Metadata Upload Errors page.